Canadian Safe Boating Course
Chapter 4: Basic Seamanship
Techniques
Different types of Rope
The seaman’s life is not always as
exciting as novels and adventure films
would have us believe. And yet, the
seaman’s tasks are vitally important to
navigation. For water rescue purposes,
“seamanship” means the knowledge
involved in handling and storing ropes,
tying knots and performing practical
tasks such as mooring and anchoring.
On a boat, we rarely use the word
“rope” but rather “lines” to describe
all of the ropes and cords used in
navigation. Moreover, each line has a
specific name, such as the painter,
halyard or fender line. Lines can be
stranded or braided. A stranded cord
consists of fibers twisted in one
direction to form a rope yarn which,
when twisted again in the opposite
direction, creates the strand. Three
strands are then twisted again in the
same direction as the fibers to create
the final rope. This alternating
torsion causes the line to tighten on
itself and thus prevents it from
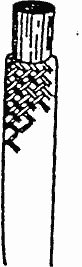
unraveling. A braided line comprises a
core of braided or stranded threads
covered with a sheath. The center or
core of the line gives it strength, and
the sheath performs more of a protective
and aesthetic function. |
 |
 |
| Stiff |
Flexible and smooth
(slips through pulley easily)
|
| Less resistant if
worn |
Less resistant if
core is damaged |
Becomes rigid and
shrinks if submerged
for long |
Remains flexible |
| Defects are readily
apparent |
Difficult to detect
defects |
| Knots hold firmly |
Some knots easily
come untied |
| Four materials are commonly used to
manufacture rope: nylon, manilla,
polypropylene and polyester. Each of
these materials has its advantages and
disadvantages, and therefore suits a
specific use. |
| Cost |
Low |
Med. to High |
high |
Low |
| Strength |
Satisfactory |
Excellent |
Good |
Poor |
| Elasticity |
Good |
Excellent |
None |
None |
| Buoyancy |
Good |
None |
None |
None |
| Weight |
Heavy |
Average |
Light |
Average |
| Abrasion
resistance |
Poor |
Good |
Excellent |
Satisfactory |
| Rot resistance |
Excellent |
Excellent |
Excellent |
Poor |
| Sun resistance |
Satisfactory |
Good |
Good |
Satisfactory |
| Shock resistance |
Satisfactory |
Excellent |
Good |
Poor |
| Standard uses |
Painter lines
Floating lines
Fender lines |
Towing
Mooring
Anchor lines |
Painter lines
Halyard |
Painter lines
Fender line |
| Main features |
Buoyancy
Strength |
Elasticity |
Strength |
(strength reduced on
contact with water) |
Rope Storage
The effects of water, salt, sand and
sun on rope fibers cause wear and tear,
thereby reducing their strength. All
ropes and lines must be protected from
wear and tear and checked on a regular
basis. Ropes that are not used
regularly should be uncoiled from time
to time to prevent them from losing
their flexibility. When storing ropes
and cords, hang them in a dry place
after proper coiling.
Another method is to form a loop,
after coiling the line, and pass one end
of the line through the loop, after
wrapping it around the coil.
Basic Knots for Boaters
Knots come in a wide variety and
entire books have been written about
them. Boaters need to know a few key
knots suited to different tasks: to
secure the boat to a hitch, to moor, to
tow, etc. The important thing is to know
the proper and easy-to-use knots for the
job at hand. Several other knots are
useful to boaters and depending on your
type of vessel you may need to know even
more about knots.
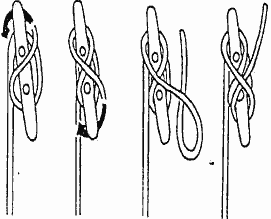
Square Knot
The square knot (or sailor’s knot) is
used to temporarily connect two ropes of
the same diameter. It is used when the
line is under constant but not extreme
tension.
Figure Eight Knot
The figure of eight knot is useful as
a stop knot to prevent a line from
slipping through a pulley, for example.
It is preferred to a half-hitch when a
larger stop knot is needed. It is also
easier to untie and tightens less.
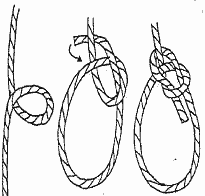
Bowline Knot
The bowline knot is used to tie a
temporary loop in the end of a rope that
will not tighten. It can be easily
untied even if placed under extreme
tension.
Clove Hitch
The clove hitch is used to
temporarily attach a rope to a pole, a
pier or any other object.
|
Mooring
Mooring involves holding the boat at the dock
without necessarily immobilizing it. Since
water, waves and tides cause boats to move, the
vessel must have some freedom of movement while
remaining secured to the dock.
Mooring can be done by fastening lines to a
bitt (small vertical bar) or a ring. The bowline
knot or clove hitch can be used to moor to a
ring, and the bowline knot, to moor to a bitt.
The boat, even an inflatable boat, must be
equipped with fenders to cushion its landing at
the dock.
 Mooring
with Lugs
Mooring
with Lugs
Properly used, the lug can be an effective
substitute for a knot. The advantage of this
type of fastener is its resistance to the
rubbing that occurs between the cord and the
lug. The technique is simple but must be used
carefully to prevent the cord from becoming
stuck. Turn the free end of the cord clockwise
around the base of the lug; then, make figure
eights, over and under each flange. End with a
half-hitch on one of the flanges. If properly
done, the line can be untied by pushing the
loose end through the half-hitch.
Anchorage
Choosing an anchorage means choosing where
to cast anchor. Several considerations affect
the choice of an anchorage.
- Is the anchorage clear of water-going
traffic?
- Is the anchorage sheltered from the
weather (wind, strong currents, etc.) and
will it remain that way?
- What is the weather forecast?
- What is the bottom like?
- Is it suitable for properly securing the
type of anchor aboard the vessel?
- Is the tide rising or falling? The
length of the line must be determined by
estimating water level variations.
To drop anchor, proceed as follows:
- Ready the anchor, chain and rope on the
deck of the vessel. Ensure that the line is
not tangled and that the free end is
properly secured to the boat.
- Maneuver the vessel directly above the
location chosen for dropping anchor.
- Cast the anchor overboard and allow the
line to sink until the anchor touches
bottom. Drop anchor at the bow of the boat
to counterbalance most of the weight, which
is in the stern.
- Allow the boat to drift with the tide or
current until the length of the line is five
to seven times the depth of the water,
depending on sea conditions.
- Fasten the line to the lug on the deck
of the vessel, and ensure that the line will
not wear by rubbing against the boat. The
line should be protected from excessive wear
and tear.
- Locate at least two fixed markers to
check the vessel’s position from time to
time to ensure that the vessel is not
drifting.
To lift anchor, proceed as follows:
- Prepare to get underway (engage motor,
secure equipment)
- Lift the anchor line, pulling the vessel
directly above the anchor.
- Clear the anchor and hoist.
- Properly secure the anchor, chain and
line.
You may consider dropping anchor as a safety
precaution for your pleasure craft:
- In poor weather (with a risk of very bad
weather ahead);
- If your vessel breaks down (or control
is lost).
Danforth, Brydon or stocked anchors are used
most often. The stocked anchor works for all
types of bottoms, but is rather cumbersome. For
that reason, vessels usually carry Danforth or
Brydon anchors. They are also effective for all
types of bottoms, but better for sandy, shell-
covered or pebbly bottoms.
To anchor effectively and safely, always
remember to fasten a chain between the line and
the anchor. With the movement of waves, the
boat will tend to rise and fall. When the chain
is used, it absorbs the effects of the waves.
However, if the anchor is fastened directly to
the boat by a rope, the motion of the waves will
move the anchor. As a result, the boat will tend
to travel because the anchor is traveling. A
simple chain between the line and the anchor
will avoid this problem.