Canadian Safe Boating Course
Chapter 2: Operating a Motor Boat
Motor Operation
The outboard motor is a spark ignition
engine. Fuel from the fuel tank enters the
carburetor where it mixes with air in a given
proportion. From the carburetor, the gas
mixture enters the cylinder. In the cylinder, a
spark plug emits a spark that ignites the
mixture, triggering an explosion that drives the
piston. This sets in motion a crankshaft (or
drive shaft) linked to the piston by a
connecting rod. Successive explosions in the
cylinder cause the crankshaft to turn and a gear
assembly activates the propeller.
The internal temperature of a spark ignition
engine is over 3200 Celsius (4000 F).
Therefore, the motor must be cooled. Outboard
motors are cooled by water.
While the motor is running, water is drawn in
through openings located at the base of the
motor (see Figure 2.1, no. 14) under the
anti-cavitation plate. Water flows around the
cylinders before being flushed out into the
surrounding body of water through a cooling
system control jet. It exits through an orifice
located near the cylinder head (see Figure 2.1,
no. 1).
Most outboard motors are two-stroke engines;
four-stroke engines also exist.
Two- and four-stroke engines differ in the
way that lubricating oil enters the cylinders.
In a two- stroke engine, oil is added to fuel
in the tank itself (manufacturers specify how
much oil to add to the fuel). However, some
two-stroke outboard engines have two tanks: one
for gas and another for oil. The oil and gas
mix automatically before reaching the cylinders.
In a four- stroke engine, oil is added through
a separate opening located near the drive shaft.
Too little oil can cause the metal to overheat
and damage the motor.
Figure 2.1 — Typical Outboard Motor

Key
- Water pump indicator
- Drive selector or gear selector
- Choke
- Starter cord
- Throttle
- Emergency stop/tension control
- Emergency stop cord
- Fastening clamp
- Motor tilt control
- Drift corrector/anti-corrosion anode
- Water outlet
- Propeller
- Oil indicator (emptying and filling)
- Water intake device
- Fuel exhaust
- Lift lever
Trouble-Shooting and Maintenance
The engine’s operating instructions usually
provide information and advice on
trouble-shooting, minor repairs and maintenance.
To prevent breakdowns, boaters should make a
habit of staying alert to signs of motor wear
and tear. Similarly, it is advisable to keep
spare parts in the tool box and learn to perform
basic repairs.
Follow these safety rules when performing
repairs:
- Tie back long hair.
- Use the proper tools.
- Remember that even a small motor can
give off a major electrical discharge.
- Disconnect the fuel line and spark plug
cables.
- Avoid operating the motor in an enclosed
area.
- Read the operating instructions before
starting the motor.
Repair Kit
The repair kit should be air-tight and
contain:
- One funnel with filter
- One knife
- Pliers (long-nose and standard)
- Flat and star (Phillips) screwdrivers
- One feeler gauge for spark plugs
- One spark-plug key
- One container of penetrating oil
- Cotter pins and one shear pin
- Spare fuses 3 Disposable cloths
- Monkey wrench (for motor bolts)
- A roll of electrical adhesive tape
- Spare spark plugs
- One starter rope
IT IS EXTREMELY IMPORTANT TO MAINTAIN
YOUR VESSEL IN GOOD WORKING ORDER TO AVOID
MECHANICAL BREAKDOWNS.
Troubleshooting
| Operating Problem |
Possible Causes |
| Motor won’t start |
- Fuel tank is empty
- Supply line is
disconnected
- Throttle not in Start
position
- Loose spark plug
- Selector not in Neutral
|
| Motor starts but not easily |
- Gas level too low
- Air inlet of tank is
closed
- Fuel line is bent
- Primer bulb not pressed
enough (should be firm)
- Choke valve not
operating properly
- Fuel contaminated by
water or impurities
- Loose spark plug wire
- Spark plug dirty or
improper spark gap
- Engine requires a tune
up
|
|
Motor running in fits and starts |
- Water or impurities in
fuel
- Idle mixture adjusting
needle of carburetor
requires adjustment
- Spark plugs are
defective (see above
problem)
|
| Propeller not turning |
- Debris caught in
propeller
- Selector not in drive
- Shear pin broken
|
| Motor vibrates |
- Fastening clamps are not
properly tightened.
- The propeller is
unbalanced.
|
| Motor suddenly stops |
- Fuel tank is empty
- No oil in fuel
(two-stroke engine)
- Loose spark plug
- Cooling water intakes
obstructed or the water pump
defective
|
Maintenance Schedule
| |
Pre-Season |
In Season |
Post-Winter |
| Fuel tank |
- Do not use tainted oil
- Keep clean and dry
|
- Mix proper proportion of
oil and fuel.
- Ensure that fuel is free
of humidity
|
|
| Fuel line |
- Check condition of hose
(cracks, poor connections)
|
|
|
| Gas filter |
|
|
|
| Motor |
|
|
|
| Starter cord |
|
|
|
| Wires |
- Check condition of wires
(cracks, slack, corrosion)
|
|
|
| Spark plugs |
- Clean and correct spark
plug gap; change as required
|
- Look for signs of spark
plug fouling and humidity
- Maintain motor in good
condition
- Clean spark plugs and
correct spark plug gap as
required.
|
|
| Cylinders |
|
|
- Protect interior of
cylinders with rust-proofing
- Blow out cylinders
|
| Moving parts |
- Lubricate all moving
parts
|
|
|
| Motor base |
- Empty oil pan and refill
with new gear oil
|
- Repeat after every 100
hours of operation or at
least once per season
|
- Empty oil pan and refill
with new gear oil
|
| Cooling system |
|
- Ensure that openings are
free of plant material
- Desalt certain models in
fresh water after salt water
use
|
- Desalt in fresh water
- Drain water completely
by activating starter cord
after disconnecting spark
plugs
|
| Propeller |
- Sand or file cracked
surfaces
|
- Check condition
regularly
|
- Check whether repairs
are required
|
| Exterior |
- Clean and touch-up paint
as required
- If motor is used in
saltwater, repaint with
rust-resistant, anti-mildew
paint.
- Treat with zinc pain
|
|
- Clean and touch-up paint
as required
|
Be aware of the Small Vessel Regulations pertaining to engine power
and load capacity.
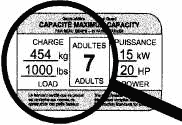
As a boat owner or operator you should know
that the “recommended gross load capacity” that
can be safely carried in the hull concerned:
- Includes the total weight of persons,
equipment, stores, fuel, motor assembly and
steering controls
- Is indicated with the “equivalent number
of adult persons”
- Is indicated on a Capacity Plate which,
if fitted, is permanently attached to the
pleasure craft
The capacity plate also indicates the
“recommended safe limits of engine power” for
the hull concerned. This calculation is based
on the recommended gross load capacity.
Motor Boat Operations
Fueling Procedures
When mixed with air, gasoline evaporates
quickly. Therefore, use caution when fueling a
boat. Because gasoline fumes are heavier than
air, they can accumulate in the hold, i.e., in
the bottom of the boat. The following procedure
is used for fueling:
- Moor the craft.
- Do not smoke in fueling area.
- Shut down all engines.
- Ensure that all persons not involved in
fueling the craft are ashore.
- Disconnect the fuel line and move
portable fuel tank ashore.
- Place fire extinguisher within easy
reach.
- While fueling, ground nozzle against
filler pipe to prevent the build up of
static electricity.
- Avoid over filling the tank or splashing
fuel.
- Close the fuel tank and clean up
spillage.
- Mix the oil and fuel in the tank, adding
one and then the other (according to the
manufacturer’s recommended ratio)
- Replace the tank in the vessel and
reconnect the fuel line; the tank should be
securely fastened in the vessel, as far from
the motor as possible.
- Press the primer bulb to begin mixing
air with the fuel.
- Operate the engine compartment blower
for at least 4 minutes immediately before
starting up the gasoline engine.
The fuel tank should be kept away from sparks
and heat and stowed in a well-ventilated
location. Always store fuel in a clearly marked
fuel container. Fuel tanks are red or orange for
safety reasons. Other colours must not be used.
Motor Installation and Adjustments
Motor Installation
Before installing the motor, ensure that the
fastening clamps (see figure 2.1, no. 8) are
open to maximum and that the motor is attached
to a safety rope or chain. If the boat is in
shallow water, tilt the motor to prevent the
propeller from scraping the bottom. At the
dock, ensure that the boat is properly moored;
however, mooring lines must provide enough slack
to allow for the effects of added weight. Place
the motor on the dock with the top section
toward the boat. Check again that the clamps are
open. Using the handles, lift the motor and set
it in place on the stern plate; tighten the
clamps and fasten the rope or chain to the boat.
Loading the Boat
Load displacement and water movement in the
hold are two factors that affect the boat’s
stability. Therefore, the load must be secured
(tied down) near the hold with ropes, and the
hold kept dry. After securing the load, also
check the trim of the boat.
Adjusting the Trim
An outboard motor boat is operated and
maneuvered as if the hull were moving parallel
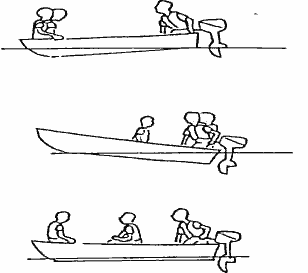
to the water. Passengers and materials must be
placed to evenly distribute the load along the
length and width of the boat.
Poor: Too much weight in
front
Poor: Too much weight in back
Correct:
Load is evenly distributed and ensures
optimal performance
One common mistake is to overload an outboard
boat. The recommended load capacity is shown on
the Capacity Plate issued by the Department of
Transport. Never exceed the specified load.
Steering System Tension
The tension of the steering system is
adjusted at its pivot point by a screw or bolt
called a copilot. It must be tightened just
enough to prevent the boat from changing
direction when the operator takes his/her hand
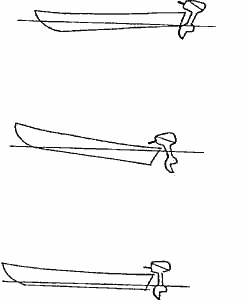
off the throttle bar. The tilt of the motor (see
Figure 2.1, no. 9) must be adjusted so that the
drive shaft is at a right angle to the surface
of the water when the motor is running at full
speed. If the motor leans too far out, the
stern of the boat will sink and the bow will
tend to tap the water. On the other hand, the
bow will tend to plough the water if the motor
is tilted too far in. Trials on the water will
show the best tilt in relation to the load.
Motor too close to waterline; vessel will
nose dive.
Motor
too far from waterline; vessel will tend to
tap surface.
Motor is at a
right angle to the water surface; operation
should be smooth if the vessel was properly
loaded.
Lift Lever
(figure 2.1, no. 16)
This important device is found on most
outboard motors and serves to hold the motor
upright against the stern plate. Since the
clamp keeps the motor in the water when the boat
is in reverse, it should normally be engaged.
As a general rule, the clamp automatically
disengages if the motor strikes an underwater
object.
Motor Controls
Starting the motor
- Connect the fuel tank to the motor (if
the tank cap has an air intake, make sure it
is open) and press primer bulb until you
feel resistance;
- Take care to remove any debris from the
propeller (see figure 2.1, no. 12) and the
cooling water intake (see figure 2.1, no.
14);
- Lock the motor tilt lever (see figure
2.1, no. 9) in the “RUN” position, and the
lift lever (see figure 2.1, no. 16) in the
“LOCK” position;
- Ensure that the drive selector (figure
2.1, no. 2) (also called a gear selector) is
in Neutral;
- Set the throttle to “START” (see figure
2.1, no. 5) and use the choke as required
(see figure 2.1, no. 3);
- In a sitting or crouched position, tug
the starter cord (see Figure 2.1, no. 4)
until you feel resistance, then pull firmly
in a single stroke. Remain seated to start
the motor;
- Check that the control jet (figure 2.1,
no. 1) from the cooling system is flowing
properly;
- Once the motor is running well, adjust
the choke.
Heading Out
- Cast off moorings.
- Shove off in the desired direction.
- Set the throttle to the “Shift”
position;
- Set the drive selector to Forward and
adjust the choke and increase the throttle
setting.
Stopping
- With the drive selector at Forward ...
slow the throttle back to the ‘Shift’
position.
- Set the drive selector to Neutral.
- Push the stop button (see figure 2.1,
no. 6) (if there is no stop button, pull on
the choke).
- On reaching the shore, tilt the
motor out of the water to avoid
damaging the propeller
The operator must sit to the right of
outboard motors that have a steering bar
connected directly to the motor.
Steering
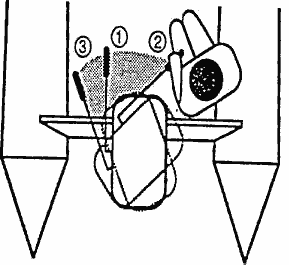
To change the direction of an outboard boat
you must change the position of the motor’s
propeller.
If the bar is pulled to the right, the bow of
the boat will turn left, and if the bar is
pulled to the left, the bow of the boat will
turn right.
With practice, boat operators will soon learn
to act quickly and correctly.
When maneuvering in reverse, the lift lock
mechanism must be engaged to prevent the motor
from tipping. Obstacles must be avoided with
great care since the motor is no longer
protected from collision.
Reversing is much more complicated than
forward maneuvering, and therefore requires
extra alertness.
Basic Maneuvers
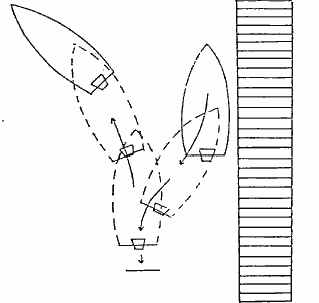
Leaving the Dock
Occupants must enter the boat when the front
and rear mooring lines are still fastened to the
dock. One person steadies the vessel while the
others board by stepping into the bottom of the
boat and keeping their bodies as low as
possible.
Follow the reverse procedure to get out of a
boat.
To leave a dock in a motor boat demands some
forethought. If other boats are nearby, the
throttle bar (gas control handle) can be moved
in the direction of the dock and the boat backed
out in reverse. If the wind is blowing from the
dock, greater force is required to clear the
dock and avoid colliding with other boats.
The boat pulls away from the dock in reverse
(throttle bar turned toward the dock). Once the
boat is fully clear, it can head out in Forward
provided the way is unobstructed.
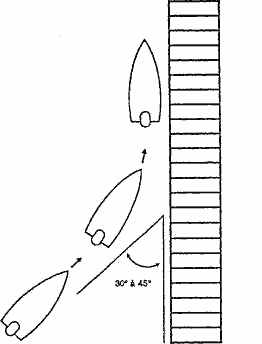
Docking
To land a boat, approach the dock at a 30-45
degree angle. Once near the dock, move the
throttle bar toward the dock to clear the bow of
the boat and take up a parallel position.
Nearer the dock, move the bar to the other
side, slow the throttle and for a instant the
boat will back up, bringing the stern close to
the dock. Once alongside the dock, moor the
boat. If the wind is blowing toward the dock, it
is best to approach from a wider angle. If the
wind is blowing from the dock, approach at a
narrower angle.
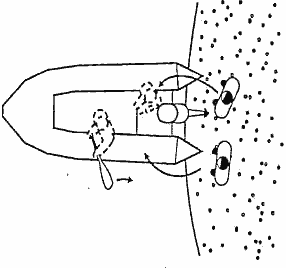
Launching from Shore
In fair weather, launching a boat from shore
is relatively easy. With the motor raised, the
boat is lifted and pushed into the water, front
first. Once the boat is afloat, with the stern
barely touching the shore, hold it at a
90-degree angle to the shore in order to board,
first in the centre, and then at the bow.
Lastly, the driver shoves the boat out into the
water, walking alongside in the water, and
boards at the stern. When launching, the person
in the centre nudges the boat out into the water
with an oar until the water is deep enough to
start the motor. This person can also guide the
boat in the desired direction. Then, after
starting the motor, shift to Forward, gaining
speed as the boat moves farther from shore.
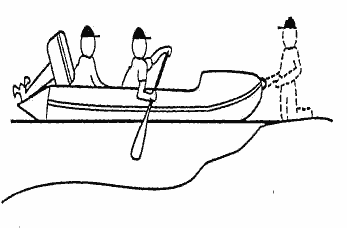
Landing on Shore
To land on shore in fair weather, stop the
motor where the water is still fairly deep and
tilt it out of the water to prevent damaging the
propeller. It is important for the driver to
instinctively know the location of the stop
mechanism and the tilting lever. To lighten the
front end, any passengers in the bow of the boat
will move to the centre and row to shore. On
reaching the shore, one person sets foot on the
ground and holds the boat steady while the other
passengers step out. Once the boat is empty, it
can be lifted and carried to the shore for
mooring. Avoid pushing the boat ashore.
In poor weather, it is best to approach the
shore backwards. This will prevent water from
accumulating in the boat. With the motor
running, turn the boat so that the stern is
toward shore. The centre passenger holds this
course with the oar. Then, stop the motor and
tilt it out of the water. The waves will carry
the boat to shore. To prevent the stern from
dipping into the trough of the waves as they
strike the bow, the rower pulls gently on the
oars.
Accelerating and Planing
Acceleration tends to make a boat leave the
water and hydroplane on the surface; this
movement is triggered by the wash of the motor.
It lifts the boat by several degrees. This
seriously diminishes the operator’s visibility
in front of the boat and makes it more difficult
to effectively use the motor’s propulsion force.
To correct this situation, simply accelerate
slightly to pass over the wave and regain a
relatively horizontal trim.
Operating in Waves
In poor weather, to reduce the risk of
capsizing or taking on water, waves must be
crossed bow first. With a motor, the boat’s
speed can be quickly adjusted to synchronize its
forward motion with the movement of the waves.
In this way, the bow crosses the waves more
easily.
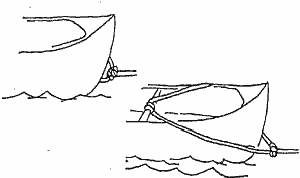
Towing
Certain rules of thumb can improve towing
efficiency:
- Towing is faster if the other boat is
pulled rather than coupled alongside the
towing boat. However, coupling is better
when the boat being towed lacks
maneuverability, since the towing boat can
steer it to some extent. This technique is
also used when the boat being towed is
unstable.
- To tow a boat and its passengers, it
must be stable and the towing boat operator
must be warned of any problems immediately
- The two boats must be aligned in the
same direction.
- The towing boat operator must constantly
monitor the situation.
- A canoe can be towed using a rope
secured around the tip of the bow. Other
types of vessels are equipped with rings
used to secure a hitch (towing rope) to a
towing boat.
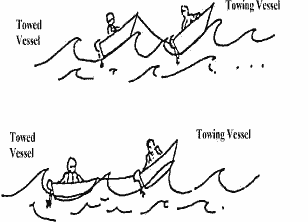 In
poor weather, the length of the tow line
depends on the waves. To avoid
collision, synchronize the speed of the
two boats and their movement over the
crest or trough of the waves. In
poor weather, the length of the tow line
depends on the waves. To avoid
collision, synchronize the speed of the
two boats and their movement over the
crest or trough of the waves.It is
extremely important that both vessels
are cresting the waves at the same time.
The length of towing rope should be
adjusted to ensure that the vessels are
properly spaced. |
| Towing is more effective if the
traction point is located in the rear
centre of the towing boat. This is done
simply if a ring or lug is installed at
the centre of the stern. Otherwise, a
V-shaped rope assembly can prevent
sideways traction on the towing boat. A
hitch attached to a V-assembly can slide
from side to side.
The towing speed depends on the boat
type, weight and means of propulsion.
It must be adjusted to keep the towed
boat steady. Where a motor boat is
used, avoid placing excessive strain on
the motor.
If possible, the hitch should be easy
to cast off. The knots used in a hitch
must be able to withstand considerable
and variable strain. The bowline knot is
the most commonly used. round turn
knot and two half hitches can be used
for towing light loads. However, never
use a square knot or a clove hitch for
towing.
Responding to Breakdowns
Know the following actions to take in
response to breakdowns on board a boat:
- Alter the speed of the craft as
appropriate to the circumstances
- Anchor the craft as appropriate
to the circumstances
- Investigate the problem
- Correct the problem if possible
- Use or exhibit signals to
indicate distress and need of
assistance if necessary.
Positive Attitudes
Operating a boat safely demands that
operators develop alertness, judgment,
caution and foresight.
Alertness
- Carefully monitor the
surroundings;
- Observe and assess navigation
conditions, weather changes and
passengers’ behaviour.
Judgment
- Assess whether the boat is
adequate to meet the navigation
conditions;
- Choose the best route.
- Operate the boat to suit weather
conditions (e.g., it is important to
slow down in bad weather to avoid
losing control of the pleasure
craft, which could increase the risk
of injuries or loss of life aboard).
Caution and foresight
- Assess the risks involved in
each maneuver;
- Plan what route to take;
- Accept your own limits as a boat
operator.
- Be thoroughly familiar with your
boat and its maneuvering capacities
(e.g., know that a pleasure craft
traveling at high speeds
requires more distance to stop
in case of an emergency, and
that its operator must be even more
alert since he/she has less time to
react to new conditions).
Provisions of the Collision
Regulations pertaining to lights and
shapes.
- A “masthead light” means a white
light placed over the fore and aft
centerline of a pleasure craft
showing an unbroken light over an
arc of the horizon of 225 degrees
and so fixed as to show the light
from right ahead to 22.5 degrees
abaft the beam on either side of a
pleasure craft as described in the
collision Regulations, Rule 21
- “Sidelights” means a green light
on the starboard side and a red
light on the port side each showing
an unbroken light over an arc of the
horizon of 112.5 degrees and so
fixed as to show the light from
right ahead to 22.5 degrees abaft
the beam on its respective side as
described in the Collision
Regulations, Rule 21
- A “stern light” means a white
light placed as nearly as practical
at the stern showing an unbroken
light over an arc of the horizon of
135 degrees and so fixed as to show
the light 67.5 degrees from right
aft on each side of a pleasure craft
as described in the Collision
Regulations, Rule 21.
- An “all-round light” means a
light showing an unbroken light over
an arc of the horizon of 360 degrees
as described in the Collision
Regulations, Rule 21.
- The operator of a pleasure power
driven craft underway shall, from
sunset to sunrise, exhibit a
masthead light forward, sidelights,
and a stern light as described in
the Collision Regulations, Rules 20
and 23.
- The operator of a pleasure power
driven craft of less than 12 metres
in length underway, may exhibit,
from sunset to sunrise, in lieu of a
masthead light forward, sidelights,
and a stern light, an all-round
white light and sidelights as
described in the Collision
Regulations, Rules 20 and 23.
- The operator of a pleasure
sailing craft underway shall, from
sunset to sunrise, exhibit
sidelights and a stern light as
described in the Collision
Regulations, Rules 20 and 25.
- The operator of a pleasure
sailing craft of less than 20 metres
in length underway may exhibit, from
sunset to sunrise, in lieu of
sidelights and a stern light, a
combined sidelights and stern light
in one lantern carried at or near
the top of the mast as described in
the Collision Regulations, Rules 20
and 25.
- The operator of a pleasure
sailing craft of less than 7 metres
in length underway shall, from
sunset to sunrise, exhibit, if
practical, sidelights and a stern
light, but if the operator cannot,
he/she shall have ready at hand an
electric torch or lighted lantern
showing a white light which shall be
exhibited in sufficient time to
prevent collision as described in
the Collision Regulations, Rules 20
and 25.
- The operator of a pleasure craft
under oars may exhibit, from sunset
to sunrise, sidelights and a stern
light, but if the operator does not,
he/she shall have ready at hand an
electric torch or lighted lantern
showing a white light which shall be
exhibited in sufficient time to
prevent collision as described in
the Collision Regulations, Rules 20
and 25.
- The operator of a pleasure craft
of less than 50 metres in length at
anchor shall exhibit, from sunset to
sunrise, in the fore part an
all-round white light as described
in the Collision Regulations, Rules
20 and 30.
Collision Regulations pertaining to
sound and light signals
- The operator of a pleasure craft
of less than 12 metres shall carry
sound signaling appliances or some
other means of making an
efficient sound signal as
described in the collision
Regulations, Rule 33.
- The operator of a pleasure craft
in or near an area of restricted
visibility, whether by day or night,
may sound a combination of prolonged
and short blasts using the whistle
or sound signaling appliances of the
pleasure craft to indicate presence
as described in the Collision
Regulations, Rule 35.
- The operator of a pleasure
craft shall recognize, use or
exhibit the following signals to
indicate distress and need of
assistance as described in Collision
Regulations, Rule 37 and Annex IV:
- A gun or other explosive
signal fired at intervals of
about a minute;
- A continuous sounding with
any fog-signaling apparatus;
- Rockets or shells, throwing
red stars fired one at a time at
short intervals;
- A signal made by any
signaling method consisting of
the group ...---... (S.O.S.) in
the Morse Code;
- A signal sent by
radiotelephony consisting of the
spoken word “MAYDAY”;
- The International Code
Signal of distress indicated by
the flags “N” and “C”;
- A signal consisting of a
square flag having above or
below it a ball or anything
resembling a ball;
- Flames on the vessel;
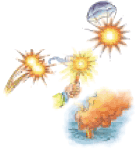
- A rocket parachute flare or
hand flare showing a red light;
- A smoke signal giving off
orange coloured smoke;
- Slowly and repeatedly
raising and lowering arms
outstretched to each side;
- Signals transmitted by
emergency position indicating
radio beacons (EPIRB);
- A piece of orange canvas
with either a black square and
circle or other symbol
appropriate for identification
from the air;
- Dye marker;
- A square shape or anything
resembling a square shape; or
- A high intensity white light
flashing at regular intervals of
50 to 70 times per minute.
Collision Regulations pertaining to
additional provisions.
- The operator of a pleasure craft
that is less than 20 metres in
length or a pleasure sailing craft
shall not impede the safe passage of
a power driven vessel following a
traffic lane as described in the
Collision Regulations, Rule 10.
- The operator of a pleasure power
driven craft shall take early and
substantial action to keep well
clear of a vessel engaged in
fishing, or a sailing vessel as
described in the Collision
regulations, Rules 16 and 18 (a).
- The operator of a pleasure
sailing craft shall take early and
substantial action to keep well
clear of a vessel engaged in fishing
as described in the Collision
regulations, Rules 16 and 18(b).
|
Standard Marine Distress Signals
If you see a distress signal, you are
required by law to determine whether you
can assist those in distress without
endangering your own life or safety of
your vessel. Where possible, you must
also contact the nearest Rescue
Coordination Center to inform them of
the type and location of the distress
signal you have seen.
Knowing the following distress
signals will help you call for help in
an emergency and recognize those in
trouble.
Not only is it against the law to
make a false distress signal, but false
alarms commit search and rescue
personnel making them potentially
unavailable or further away from real
emergencies. |
Marine Radio
Distress Call
 Use
2182 kHz (MF) or channel 16, 156.8 MHz
(VHF) DSC alert, channel 70 (only for
DSC type radios and where the service is
offered.) Use
2182 kHz (MF) or channel 16, 156.8 MHz
(VHF) DSC alert, channel 70 (only for
DSC type radios and where the service is
offered.)
Calling Procedures
Mayday, Mayday, Mayday — Immediate
danger for persons OR ship
Pan-Pan, Pan-Pan, Pan-Pan — Urgent
message concerning safety of a person or
ship
- Give vessel name and call sign
- State position of vessel
- Describe nature of emergency
|
 Distress
Cloth Distress
Cloth
To attract attention, spread on cabin
or deck top, or fly from mast.
 Arm
Signal Arm
Signal
Raise and lower outstretched arms
repeatedly.
Sound Signals
 Continuous
sounding with any fog-signaling
apparatus. Gun or other explosive signal
fired at intervals of about a minute. Continuous
sounding with any fog-signaling
apparatus. Gun or other explosive signal
fired at intervals of about a minute. |
Code Flag
 |
Dye Marker

Flashlight
 |
Radio beacon
(EPIRB)

|
Flares
 |
